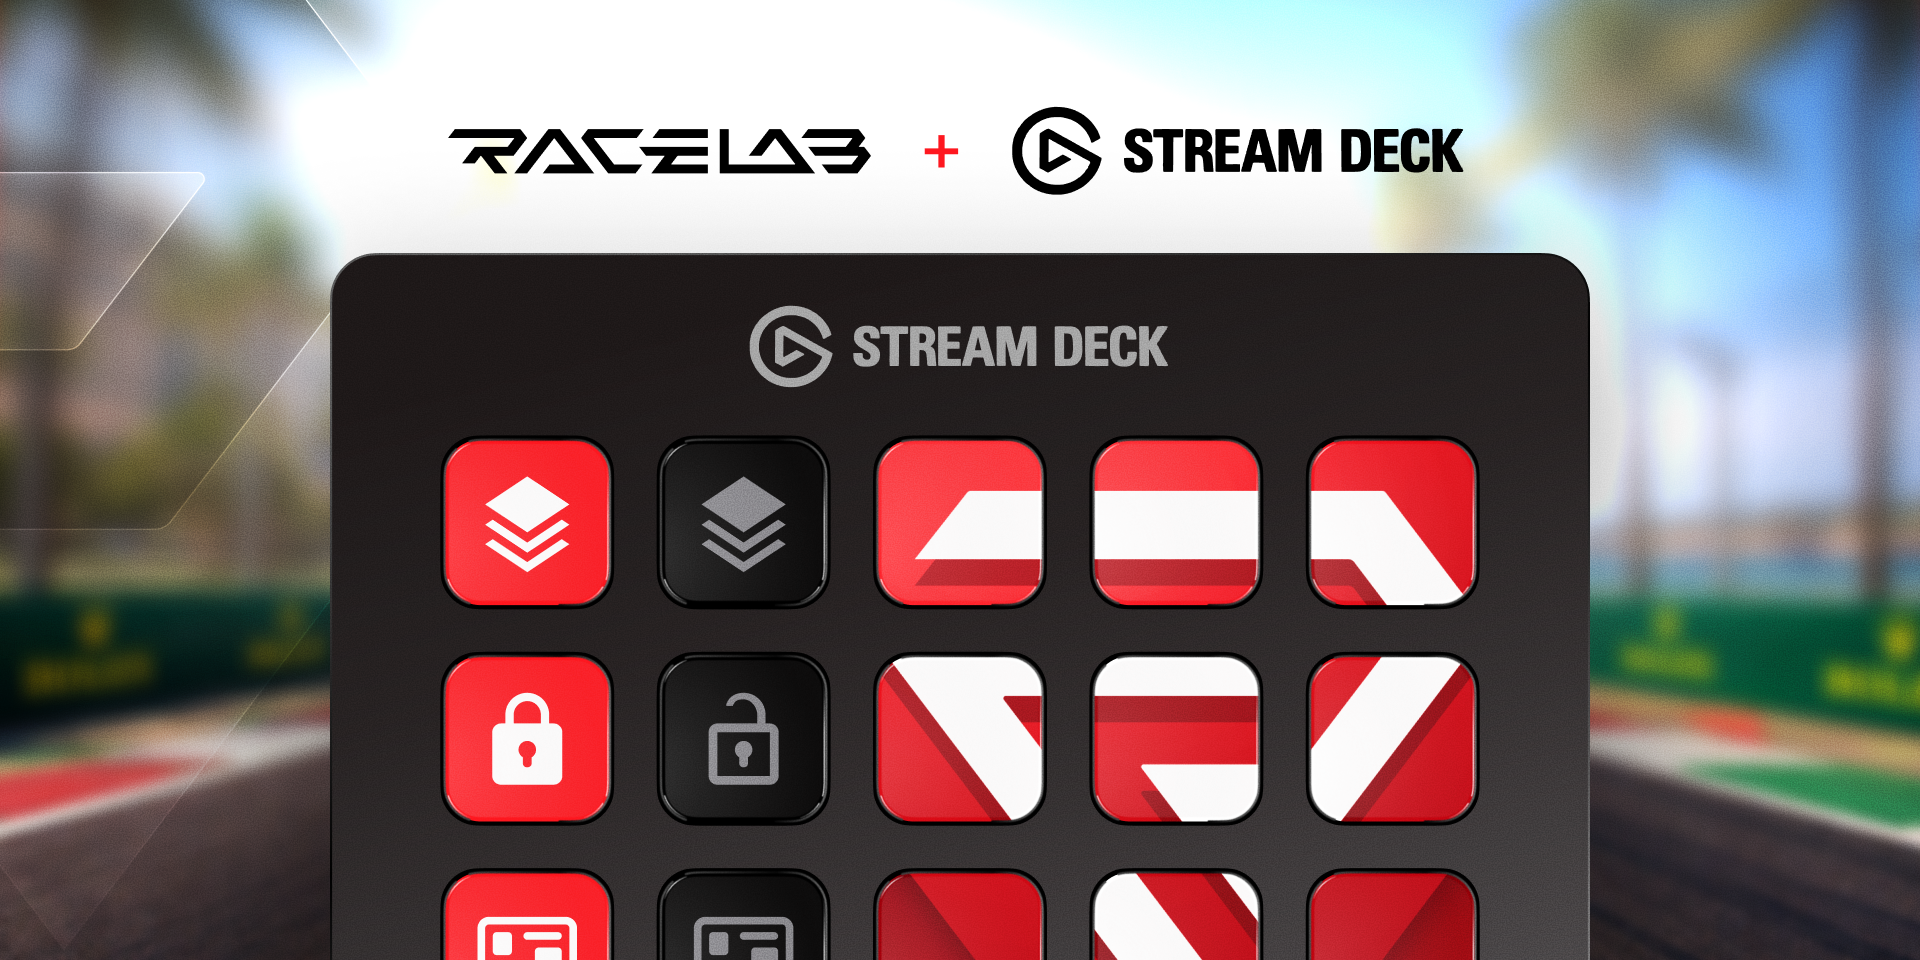
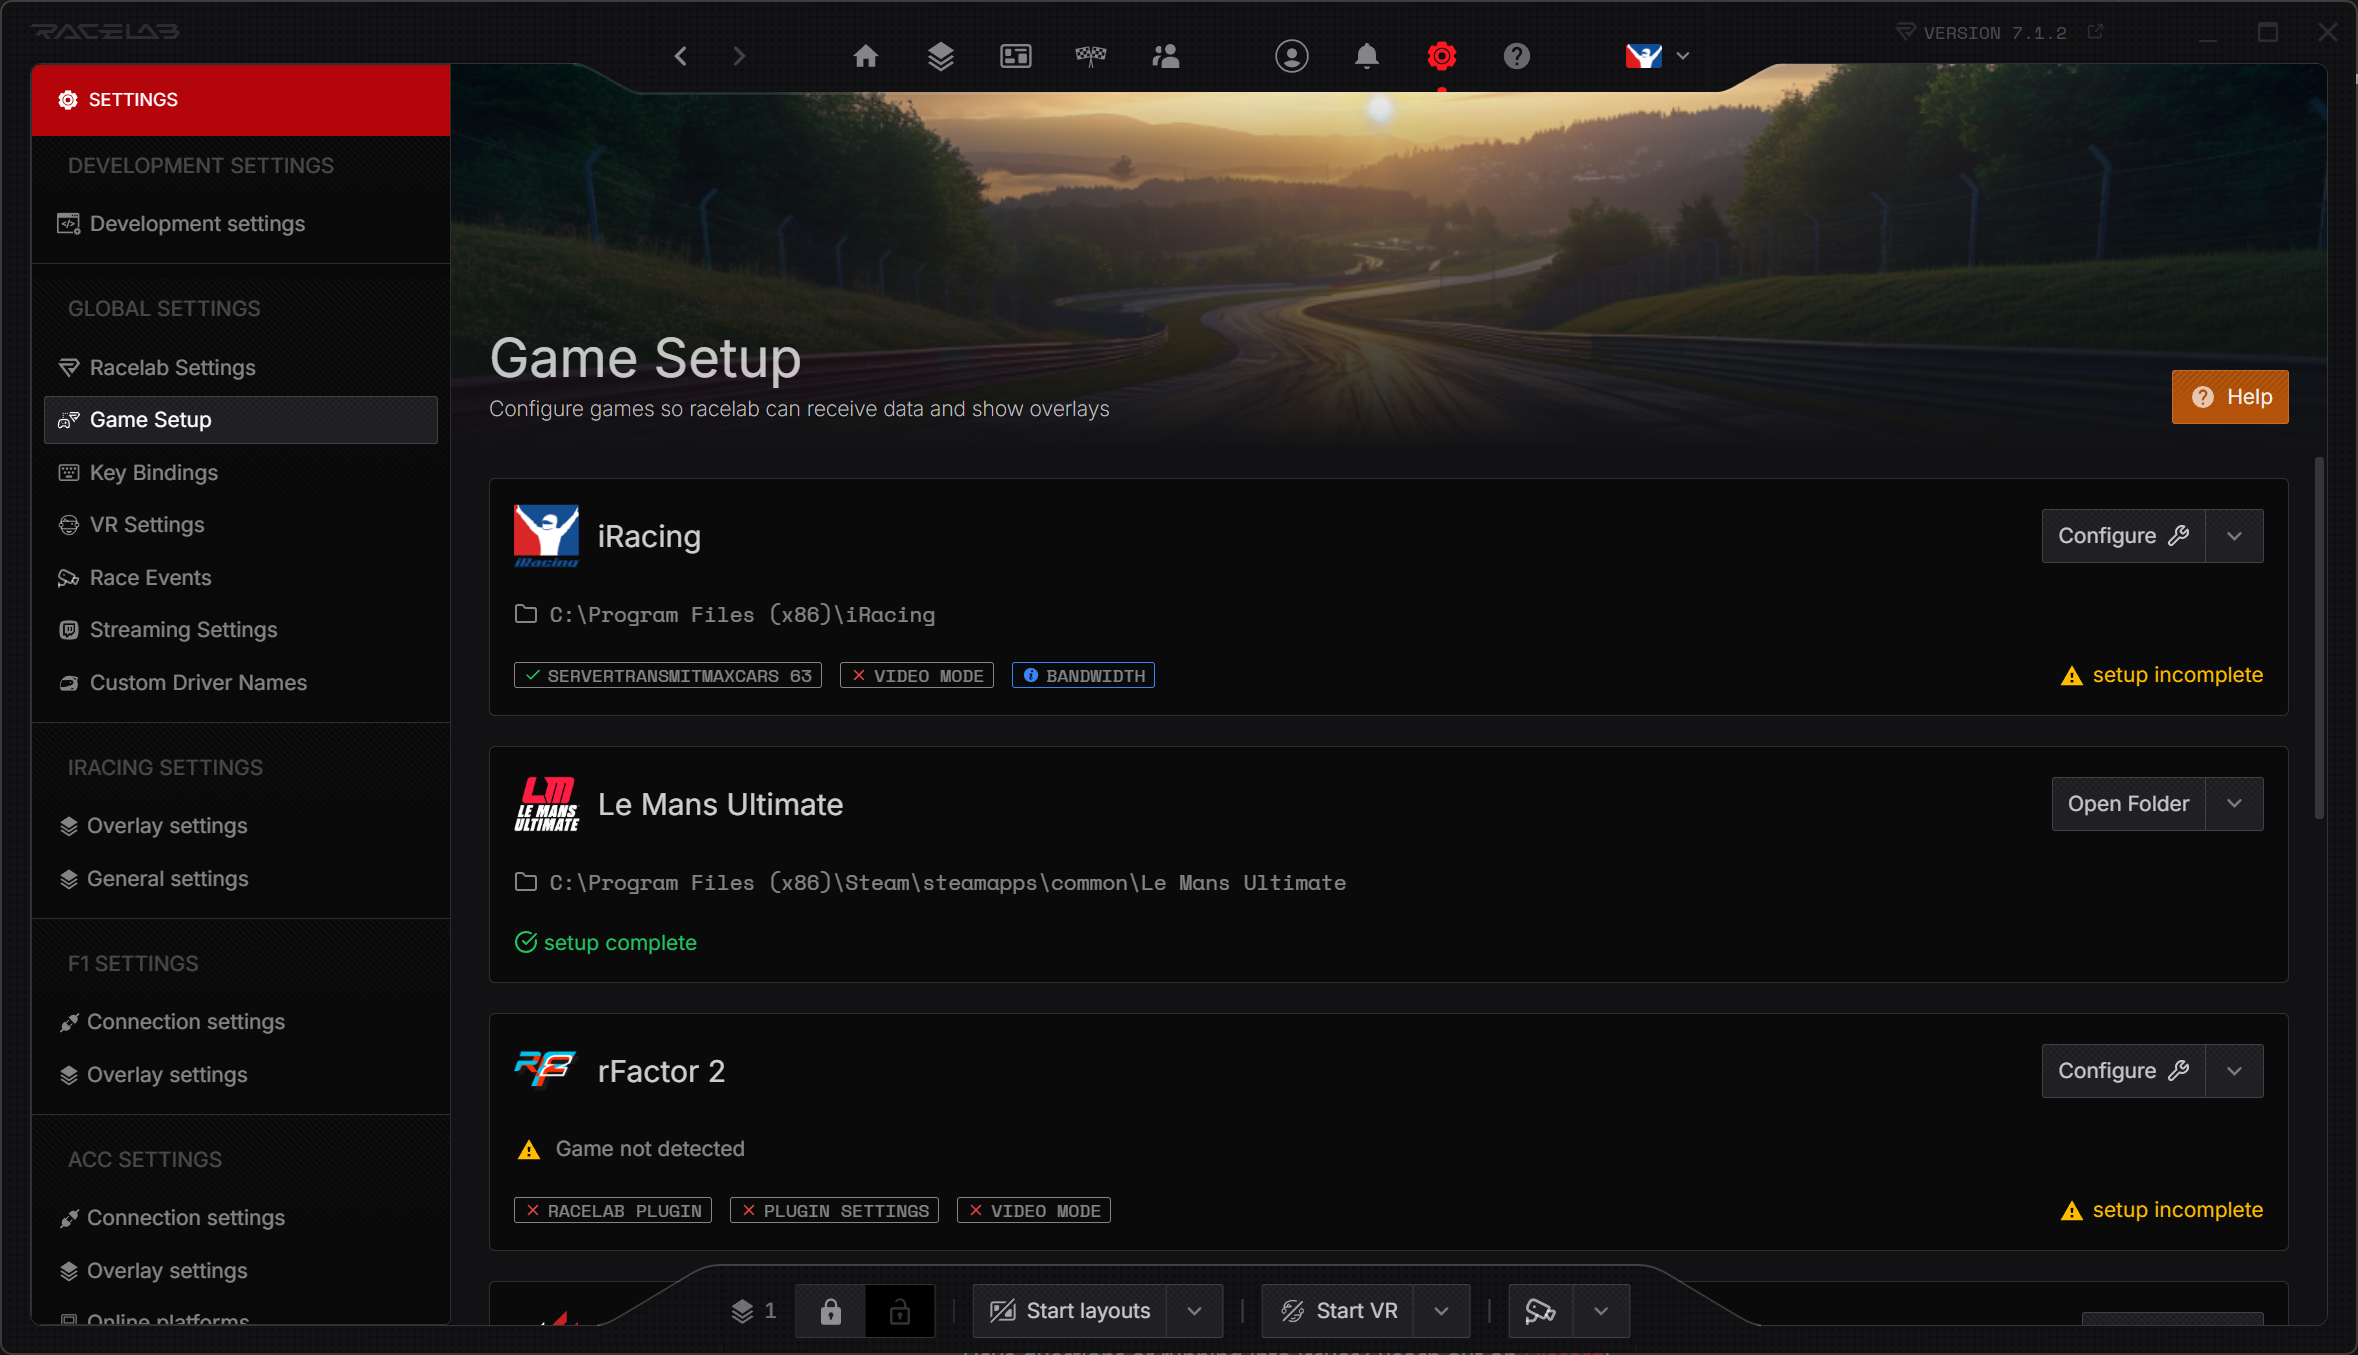
15 posts tagged with "Feature"

Major feature announcements

View All Tags

New: Car Class Grouping by Car Number

ยท 2 min read

Running a custom league or special event in iRacing? We've got something for you. ๐Ÿ

RaceLab now supports a new Car Class Grouping option: Group by Car Number (hundreds).

How it worksโ€‹

This option groups cars based on the hundreds digit of their car number. For example:

  • Cars #100-199 are grouped together as one class
  • Cars #200-299 form another class
  • And so on

This means league organizers and event hosts can define custom class groupings simply by assigning car number ranges - and RaceLab will automatically pick them up and display them correctly in your Standings and Relative overlays.

Why this mattersโ€‹

In official iRacing series, car classes are defined by the sim itself. But in custom leagues and special events, organizers often create their own class structures. Until now, RaceLab couldn't always group these correctly. With car number-based grouping, your overlays will show the right classes as long as the event uses number ranges to separate them.

How to enable itโ€‹

  1. Open RaceLab and go to Settings
  2. Look for the Car Class Grouping option under iRacing settings
  3. Select Group by Car Number (hundreds)
  4. Your Standings and Relative overlays will now group drivers accordingly

Perfect for endurance leagues, community events, or any race where custom class structures are used. Let us know how it works on Discord!

One-Click Game Setup

ยท One min read

Setting up your games for RaceLab just got a whole lot easier. Introducing One-Click Game Setup! ๐Ÿš€

The problemโ€‹

Getting your sim racing game configured correctly for RaceLab used to require a few manual steps - adjusting display settings, enabling shared memory, configuring file paths. It wasn't hard, but it was easy to miss a step and then wonder why things weren't working.

The solutionโ€‹

With Game Setup, RaceLab can now automatically configure your games with a single click. No more digging through game settings or following multi-step guides. Just click the Configure button and RaceLab handles the rest.

Automatic Game Setup

How to use itโ€‹

  1. Open RaceLab and go to Settings โ†’ Game Setup
  2. You'll see a list of your installed games
  3. Click the Configure button next to any game
  4. RaceLab will apply the required settings automatically

That's it. One click and you're ready to race.

Have questions or running into issues? Reach out on Discord!

The Lumina Theme & Column Reordering

ยท 2 min read

Lumina Theme - Relative Overlay

Your Standings and Relative overlays just got a major visual upgrade! Introducing the Lumina Theme and column reordering. โœจ

The Lumina Themeโ€‹

Lumina is an all-new theme for the Standings and Relative overlays. It features a fresh, modern design that's clean, readable, and looks great on stream or in your cockpit.

Available for both:

  • Standings Overlay (added in v6.18.0)
  • Relative Overlay (added in v6.15.1)

Column Reorderingโ€‹

You can now drag and reorder columns in your Standings and Relative overlays. Want iRating next to the driver name? Prefer gaps before lap times? Just drag the columns into your preferred order.

This gives you full control over how your data is displayed - no more settling for the default column order.

Driver Flags Across All Gamesโ€‹

We've also added driver flag support to the Standings and Relative overlays across all supported games. See nationality flags right next to driver names for better identification at a glance.

How to try itโ€‹

  1. Open the settings for your Standings or Relative overlay
  2. Select Lumina from the theme dropdown
  3. Drag columns to reorder them to your preference
  4. Enable driver flags in the column settings

Let us know what you think of the new look on Discord!

New Widget: Odometer

ยท One min read

How far have you driven in your favorite car? Now you can find out! Introducing the Odometer widget. ๐Ÿš—

What it doesโ€‹

The Odometer tracks the total distance you've driven in each car - across all sessions, all tracks, all time. It's a persistent counter that keeps ticking as long as you're on track.

Whether you've put 500 km or 5,000 km into your go-to car, the Odometer gives you a satisfying way to see just how much seat time you've accumulated.

How to add itโ€‹

  1. Open your Layout Editor
  2. Search for Odometer in the widget list
  3. Add it to your layout and position it wherever you like
  4. Drive - your distance will be tracked automatically from here on

A fun little widget that adds some personality to your setup. Let us know what you think on Discord!

New Overlay: G-Force Meter

ยท 3 min read

G-Force Meter Overlay

Feel the forces! The brand new G-Force Meter overlay is here. ๐ŸŽฏ

What is a traction circle?โ€‹

The traction circle (also known as a friction circle) is one of the most powerful tools for understanding vehicle dynamics. It visualizes the total grip your tires have available and how you're using it at any given moment.

Your tires can only produce a finite amount of grip. That grip can be used for braking, accelerating, or cornering - but the total is always limited. The traction circle shows this as a circular boundary: the closer the dot is to the edge, the more grip you're using. If the dot stays inside the circle, you have grip to spare. If it hits the edge, you're at the limit.

What does this tell you as a driver?โ€‹

  • Trail braking - A smooth arc from the top of the circle (braking) to the side (cornering) means you're trail braking well. A sudden jump means you're releasing the brake too quickly and losing time
  • Corner exit - The transition from cornering to acceleration should be a smooth arc along the circle's edge. Jerky movements mean you're not using all available grip
  • Smoothness - Erratic dots bouncing around inside the circle indicate rough inputs. The fastest drivers keep the dot tracing the edge of the circle as smoothly as possible
  • Finding the limit - If your dot rarely reaches the outer edge, you're leaving grip on the table. If it's constantly spiking past it, you're overdriving

What you getโ€‹

  • Traction circle - A live visualization of your lateral and longitudinal G-forces as you drive around the track
  • Current forces - Real-time G-force numbers showing exactly how much grip you're using
  • Peak G-force - Track your maximum forces to understand the limits of your car

The G-Force Meter is also available as a module inside the Input Telemetry overlay, so you can combine it with your existing pedal and steering inputs for a complete picture of your driving.

How to use itโ€‹

  1. Open your Layout Editor
  2. Add the G-Force Meter overlay, or enable the G-Force module in your Input Telemetry overlay settings
  3. Position it to your liking
  4. Hit the track and watch the forces come alive

Whether you're working on trail braking, chasing smoother inputs, or just want to understand your driving better, this overlay is an invaluable coaching tool. Share your feedback on Discord!

ABS Indication in Input Telemetry

ยท 2 min read

ABS Indication

Ever wonder if you're triggering ABS under braking? Now you can see it in real time. ๐Ÿ‘€

The Input Telemetry overlay now includes ABS indicators - visible on both the brake telemetry line and the input braking bar.

What it showsโ€‹

When ABS activates during braking, the overlay will visually indicate it directly on your telemetry:

  • Brake telemetry line - The ABS activation is highlighted on the brake trace, so you can see exactly when and how often ABS kicks in during your braking zones
  • Input braking bar - The brake pressure bar also reflects ABS engagement, giving you an instant visual cue while driving

Why this is usefulโ€‹

ABS is a safety net - it prevents wheel lockups, but relying on it too heavily means you're not braking optimally. By seeing when ABS activates, you can:

  • Fine-tune brake pressure - Learn to apply just enough pressure to stay on the edge of locking up without triggering ABS
  • Improve braking consistency - Identify which corners you're overbraking and where you could carry more speed
  • Understand car setup - See how brake bias and ABS settings affect your braking performance across different corners

How to use itโ€‹

The ABS indicators are automatically available in the Input Telemetry overlay. Just make sure you have the brake telemetry line or input braking bar enabled in your overlay settings, and the ABS indication will show up whenever ABS engages.

A small addition that can make a big difference in your braking technique. Let us know what you think on Discord!

The New Key Bindings System

ยท 2 min read

We've completely rebuilt the Key Bindings system from the ground up! โŒจ๏ธ

The old key bindings system served us well, but it had limitations - especially when it came to supporting a wide range of input devices. The new system removes those barriers and gives you much more flexibility.

What's changedโ€‹

  • Unlimited button support - Bind as many buttons as you need across all your devices. No more running out of slots
  • Wider device compatibility - Improved support for a wider range of input devices including button boxes, steering wheel buttons, and USB controllers
  • Better detection - More reliable input detection so your bindings work consistently

Why we rebuilt itโ€‹

As RaceLab has grown to support more overlays, features, and games, the number of actions you can bind has grown too. The old system wasn't built for this scale. The new Key Bindings system is designed to grow with RaceLab and handle whatever input setup you throw at it.

How to set up your bindingsโ€‹

  1. Open RaceLab and go to Key Bindings
  2. Browse the list of available actions (toggle overlays, open/close windows, etc.)
  3. Click on an action and press the button or key you want to assign
  4. Done - your binding is active immediately

All your existing bindings have been migrated automatically, so you don't need to reconfigure anything.

Got a complex setup with multiple devices? This update was made for you. Let us know how it works on Discord!

RacelabVR 3.0 is Here!

ยท 2 min read

RacelabVR 3.0

After months of beta testing and your incredible feedback, RacelabVR 3.0 is officially stable and available to everyone! ๐ŸŽ‰

This is a major milestone for RaceLab. VR 3.0 brings native overlay rendering directly into your VR headset, meaning you no longer need to rely on workarounds or third-party tools. Your RaceLab overlays live right there in your virtual cockpit, exactly where you need them.

What's new in VR 3.0โ€‹

  • Native VR overlays - Your overlays render directly in your VR headset with minimal performance impact
  • Overlay Sets - Save multiple overlay configurations and switch between them depending on your setup
  • In-headset positioning - Move and resize overlays while in VR using intuitive controls (Tab, Esc, Space, M keys)
  • Curvature support - Bend overlays for a more immersive display (OpenVR)
  • Gaze-Based Transparency - Overlays fade based on where you're looking, reducing visual clutter
  • Resolution scaling - Fine-tune overlay resolution for the best balance of clarity and performance

Supported platformsโ€‹

RacelabVR 3.0 works with both OpenVR and OpenXR runtimes, supporting a wide range of headsets including Valve Index, Meta Quest (via Link/Air Link), HP Reverb, Pimax, Varjo, and more.

Getting startedโ€‹

  1. Make sure you're on the latest version of RaceLab
  2. Go to Settings and enable RacelabVR
  3. Launch your sim in VR and your overlays will appear in your headset
  4. Use the in-headset controls to position them exactly where you want

Check our VR documentation for the full setup guide.

A huge thank you to everyone who participated in the beta and helped us shape this release. Your feedback was invaluable! โค๏ธ

Questions or issues? Let us know on Discord.

New Overlay: ERS (Energy Recovery System)

ยท One min read

Managing your energy just got a whole lot easier! The ERS overlay is now available for LMU and rFactor2. โšก

Hybrid and electric racing cars rely heavily on energy recovery and deployment. Knowing exactly how much energy you have available - and when to use it - can make the difference between a podium and a DNF. The new ERS overlay and widget give you real-time visibility into your car's energy recovery system.

What's includedโ€‹

  • ERS Overlay - A dedicated overlay showing your current energy state
  • ERS Widget - A compact datablock you can place anywhere in your layout

Supported gamesโ€‹

This feature is available for:

  • Le Mans Ultimate (LMU)
  • rFactor2

How to add itโ€‹

  1. Open your Layout Editor
  2. Search for ERS in the overlay or widget list
  3. Add it to your layout and position it to your preference
  4. Jump into a session with a hybrid/electric car and watch your energy data come to life

Perfect for anyone racing LMH, LMDh, or any hybrid machinery in LMU. Let us know your feedback on Discord!

New Overlay: Race Schedule

ยท One min read

Race Schedule Overlay

No more alt-tabbing to check when your next race starts! The new Race Schedule overlay brings your upcoming sessions right into your layout. ๐Ÿ“…

What it doesโ€‹

The Race Schedule overlay shows your upcoming race sessions at a glance. Whether you're waiting for the next official race to go green or planning your evening sessions, this overlay keeps that info right where you need it - on screen, in your layout.

See it in actionโ€‹

How to use itโ€‹

  1. Open your Layout Editor
  2. Add the Race Schedule overlay from the overlay list
  3. Position it wherever works best for you
  4. That's it - it will automatically show your upcoming sessions

A simple but handy addition to your setup. Let us know what you think on Discord!

Community Layouts Have Arrived!

ยท One min read

Layout Sharing

You've been building amazing layouts in RaceLab, and now you can share them with the world. Browse layouts created by other users, try out new ideas, and publish your own for the community to enjoy.

How it worksโ€‹

  • Share your layouts - Publish any of your layouts to the community with a single click
  • Browse and explore - Discover layouts from other users, filter by game and style
  • One-click import - Found a layout you like? Add it to your collection instantly

Get startedโ€‹

  1. Open RaceLab and head to the Layouts section
  2. Look for the Community tab to browse shared layouts
  3. Hit the Share button on any of your own layouts to publish it

We can't wait to see what the community creates. Share your best layouts and discover new setups on Discord!

New Widgets: Session Split & CPU Load

ยท 2 min read

Session Split Widget

Three new widgets just landed in RaceLab! ๐ŸŽ‰

Session Splitโ€‹

If you race on iRacing, you've probably noticed that popular series can have dozens - sometimes hundreds - of drivers registered for a single time slot. iRacing handles this by splitting the field into separate sessions, called splits. The fastest drivers end up in the top split (Split 1), and the rest are distributed across lower splits based on iRating.

Knowing which split you're in matters:

  • Top split races tend to be cleaner and more competitive
  • Lower splits can be more chaotic but also more fun and forgiving
  • Your split affects the Strength of Field (SOF), which determines how much iRating you gain or lose

The new Session Split widget shows your current split number right in your layout, so you always know where you stand before the green flag drops.

CPU Load Widgetsโ€‹

We've also added two new CPU monitoring widgets for those who like to keep an eye on system performance while racing:

CPU Widgets

  • CPU Load (All Cores) - Shows the load for each individual CPU core, useful for spotting if a single core is maxing out (common in sim racing)
  • CPU Load (Simple) - Displays your overall CPU usage as a single number for a quick at-a-glance check

How to add themโ€‹

  1. Open your Layout Editor
  2. Search for Session Split, CPU Load, or browse the widget list
  3. Add them to your layout and position them wherever you like

Simple widgets that fill common gaps. Let us know what you think on Discord!

Automobilista 2 Integration!

ยท One min read

RaceLab x AMS2

It's here - Automobilista 2 is now fully supported in RaceLab! ๐Ÿ

AMS2 has been a highly requested game in the community, and we're excited to bring full RaceLab support to it - including LFM (Low Fuel Motorsport) integration.

What's included?โ€‹

All core RaceLab features work with AMS2 out of the box:

  • Live Overlays - Standings, relative, inputs, fuel calculator, and more
  • Track Maps - Live driver positions on track
  • Telemetry - Lap times, sector splits, fuel data
  • LFM Integration - Full support for Low Fuel Motorsport's AMS2 racing platform

Getting startedโ€‹

  1. In RaceLab, go to Settings โ†’ Game Setup
  2. Find Automobilista 2 and click Configure
  3. Launch AMS2 and hop into a session - RaceLab will handle the rest

Check our AMS2 first steps guide for the full setup walkthrough.

We need your feedback!โ€‹

As with any new integration, there may be rough edges. If you encounter any issues or have suggestions, please let us know on Discord. Your feedback helps us improve the experience for everyone.

Happy racing! ๐ŸŽ๏ธ

New Overlay: Overtake Alert

ยท 2 min read

Overtake Alert Overlay

Racing in multiclass? You need this. Introducing the Overtake Alert overlay! ๐ŸŽ๏ธ

One of the trickiest parts of multiclass racing is knowing when a faster class is closing in on you. Miss that approaching prototype and you'll ruin both your race and theirs. The Overtake Alert overlay solves this by notifying you whenever a faster car class is approaching, giving you time to plan your move and let them through cleanly.

How it worksโ€‹

When a faster car class gets within range, the Overtake Alert will pop up with key information about the approaching car:

  • Car number - Know exactly who's coming
  • iRating - See their rating at a glance
  • Safety rating - Useful context for how they might drive around you
  • Driver license - Additional driver info

Why you'll love itโ€‹

  • Stay aware - No more surprise divebombs from a prototype you didn't see coming
  • Race cleaner - Give way at the right moment instead of causing incidents
  • Customizable - Dark mode, opacity settings, and shortkey support for toggling it on/off

Getting startedโ€‹

  1. Open your Layout Editor
  2. Add the Overtake Alert overlay
  3. Configure it via the overlay settings (columns, appearance)
  4. Bind a shortkey if you want to toggle it during a session

This is a must-have for anyone racing multiclass series like IMSA, ESS, or special events. Let us know how it works for you on Discord!

Introducing the Leaderboard Overlay

ยท One min read

Leaderboard Overlay

A brand new overlay just dropped - the Leaderboard Overlay is here! ๐ŸŽ‰

This overlay shows the leaderboard for your series within a season in iRacing, or even the all-time standings. For other supported games, it displays a leaderboard for your current track and car combination.

What does it show?โ€‹

  • Positions - See where everyone sits in the overall standings
  • Lap times - Keep an eye on who's fast and who's falling behind
  • Gaps - Track intervals between drivers
  • Dark mode - A dark mode option is available for better readability

How to use itโ€‹

  1. Open your Layout Editor in RaceLab
  2. Add the Leaderboard Overlay from the overlay list
  3. Position and resize it to your liking
  4. Start a session and it will populate automatically

Give it a try and let us know what you think on Discord!